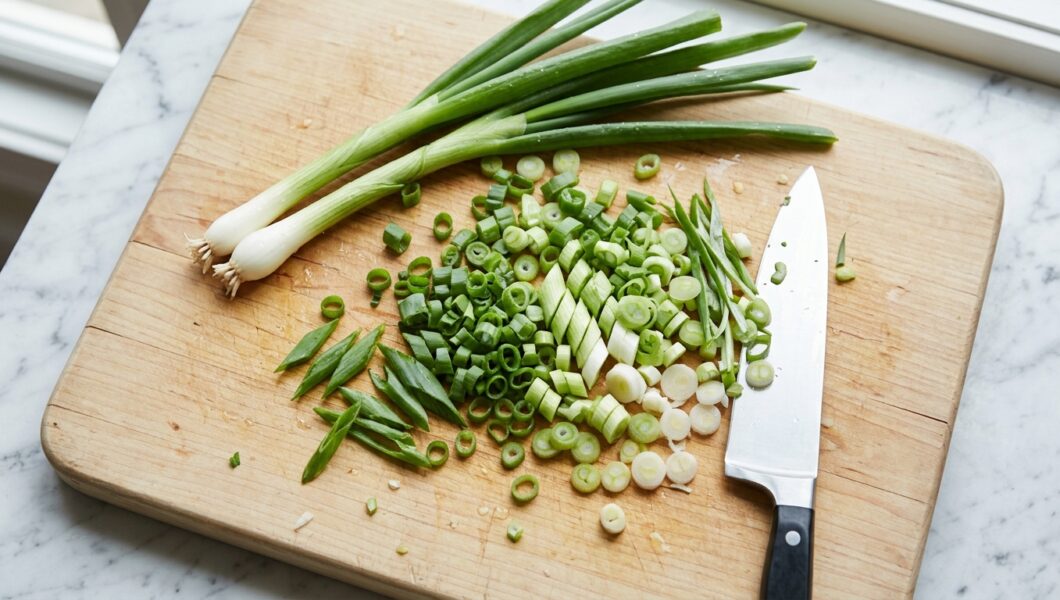
Green onions finish soups, brighten noodles, flavor eggs, and add a fresh bite to almost any savory dish. They are also easy to chop badly. Mushy slices, bruised greens, and uneven pieces usually come from a dull knife or a rushed technique. This guide shows you how to chop green onions cleanly, which cut suits which dish, and how to store them so they stay crisp.
Green Onions, Scallions, and Spring Onions
“Green onion” and “scallion” generally mean the same thing: a young onion with a straight white base and long, hollow green tops. Spring onions look similar but have a round bulb at the bottom and a stronger flavor. The method below works for both, and spring onion bulbs can be sliced like regular onion.
Know the Parts
- White part:
The firmest and sharpest section, good for cooking in oil at the start of a recipe.
- Light green part:
Milder and still fairly firm, good for cooking or garnish.
- Dark green tops:
The softest and most delicate, best raw or added at the end.
What You Need
- A sharp chef’s knife or santoku, since a dull knife crushes the onion instead of slicing it
- A stable cutting board, with a damp paper towel underneath to stop slipping
- Paper towels or a clean, dry kitchen towel
- Kitchen shears (optional, for a quick shortcut)
Step-by-Step: How to Chop Green Onions
- Rinse and dry
Rinse under cool water, rubbing off any grit, then pat completely dry. Wet onions slip under the knife and turn slimy.
- Trim the roots
Cut off about a quarter inch of the stringy root end.
- Remove damaged parts
Peel away any wilted outer layer and trim dried or yellowed tips.
- Line them up
Gather three to five onions and align the root ends so you can cut several at once.
- Separate the parts
Cut the white and light green sections from the dark green tops so you can use them separately.
- Use the claw grip
Tuck your fingertips inward and rest the flat of the blade against your knuckles.
- Slice smoothly
Glide the blade forward and down rather than pressing hard. Let the knife do the work.
Cuts at a Glance
| Cut | Best for | How to do it |
| Thin rounds | Garnish, soups, eggs, dips | Slight straight across at about 1/8 inch |
| Thick rounds | Stir-fries, fried rice | Slice across at about 1/4 inch |
| Bias (diagonal) | Salads, noodle dishes | Angle the knife about 45 degrees |
| Long strips | Garnish, Asian-style dishes | Cut 2 to 3 inch lengths, halve lengthwise, slice thinly |
| Minced | Butters, marinades, spreads | Slice thin then rock the knife over the pieces |
Tips for Cleaner Cuts
Keep the knife sharp
A sharp blade slices through the thin layers without tearing them and releases less of the juice that makes your eyes water.
Pull, don’t push
Sliding the blade through the onion works better than pressing straight down, which flattens and bruises the greens.
Work in small bundles
A few onions are easy to control, while a big pile slides around and cuts unevenly.
Stay consistent
Even slices cook at the same speed and look better on the plate.
Shears and Curls
For a quick job, hold a dry bundle of green onions over the dish and snip across in short, even pieces. It is fast, creates less mess, and works well for garnishing soups and noodles.
For decorative curls, cut the dark green parts into 3-inch lengths, slice them lengthwise into very thin strips, and drop them into ice water for 5 to 10 minutes. They will curl up. Drain and pat dry before using.
When to Add Green Onions
Add the white and light green parts early, cooking them in oil for a minute or two to build a savory base. Add the dark green tops at the end, or raw as a garnish, so they stay bright and fresh. Cooking tender greens too long turns them dull and limp.
How to Store Green Onions
- Whole:
Wrap unwashed onions loosely in a slightly damp paper towel and refrigerate in the crisper drawer. They usually last one to two weeks.
- In a jar:
Stand the roots in an inch of water, cover the tops loosely, and refrigerate. Change the water every few days.
- Chopped:
Dry the pieces well and store them in an airtight container lined with a paper towel for several days.
- Frozen:
Freeze chopped onions on a tray, then move them to a freezer bag. They keep for months and suit cooked dishes, though they lose crunch.
You can also regrow green onions by placing the roots in water on a sunny windowsill.
Common Mistakes to Avoid
- Using a dull knife
It crushes the onion and leaves ragged edges.
- Chopping wet onions
They slip and turn slimy.
- Pressing straight down
Use a gliding motion instead.
- Cooking the greens too long
Add tender tops at the end.
- Discarding the whites
They are flavorful and perfect for cooking.
Safety Precautions
Use the claw grip every time and keep the knife tip on the board. Place a damp towel under the cutting board so it can’t slide, cut away from your body, and never try to catch a falling knife. Wash your hands, board, and knife afterward, especially if you handled raw meat nearby.
Frequently Asked Questions
Can I eat the whole green onion?
Yes. The white, light green, and dark green parts are all edible.
Do I need to cut off the white part?
No. It is the firmest and most flavorful part, and it is excellent cooked.
How thin should I slice green onions for garnish?
About 1/8 inch is a good rule, and thinner works for delicate dishes.
Why do green onions get slimy when I chop them?
Usually from excess moisture or age. Dry them thoroughly and use fresh ones.
Can I chop them ahead of time?
Yes. Store them dry in an airtight container in the fridge for a few days.
The Bottom Line
Chopping green onions comes down to a sharp knife, dry onions, and a smooth slicing motion. Trim the roots, separate the whites from the greens, line up a small bundle, and slice with a gentle glide using the claw grip. Use the whites early in cooking and the greens at the end, and store leftovers dry in the fridge. Master those basics and you’ll get clean, bright, even slices every time.