You carefully apply a new screen protector to your phone. Everything looks perfect until you notice tiny bubbles underneath the surface. They make your screen look messy and can be distracting when you use your phone.
The good news? Most screen protector bubbles are easy to fix.
Whether you have trapped air, dust, or small pockets under the adhesive, you can often solve the problem without replacing your screen protector.
In this guide, we’ll explain how to remove bubbles from a screen protector in five easy steps, why they appear, and how to prevent them the next time you apply one.
Why Do Bubbles Appear Under a Screen Protector?
Screen protector bubbles usually appear when air, dust, or moisture gets trapped between the protector and your phone’s display.
Here are the most common causes:
- Trapped air: Air pockets form when the protector doesn’t stick evenly to the screen.
- Dust and debris: Tiny particles prevent the adhesive from making full contact with the display.
- Moisture: Water or leftover cleaning solution can create cloudy patches or bubbles.
- Poor application: Incorrect alignment or pressing the protector down too quickly can trap air.
- Damaged adhesive: A worn-out or low-quality protector may not stick properly.
Understanding the cause helps you choose the right solution instead of repeatedly pressing the same bubble.
Can Screen Protector Bubbles Go Away on Their Own?
Sometimes, yes.
Small air bubbles under certain film screen protectors may gradually disappear as the adhesive settles. This can take a few hours or a couple of days, depending on the protector.
However, bubbles caused by dust or debris usually won’t disappear on their own. The particle physically prevents the adhesive from touching the screen.
If you notice a bubble with a tiny speck in the center, you’ll likely need to remove the particle or replace the protector.
What You’ll Need to Remove Screen Protector Bubbles
Before starting, gather these simple items:
- Microfiber cloth: To clean your phone’s display without scratching it.
- Dust removal sticker: To lift tiny dust particles.
- Clear tape: An alternative for carefully removing dust from the adhesive side.
- Plastic card or squeegee: To push trapped air toward the edge.
- Screen cleaning wipe: To remove fingerprints and dirt before application.
Avoid metal tools, sharp objects, and excessive pressure. They can damage your phone’s display or screen protector.
How to Remove Bubbles from a Screen Protector in 5 Steps
Follow these five steps to remove bubbles and get a smoother finish.
Step 1: Clean Your Screen and Hands
Start by preparing a clean workspace.
Wash and dry your hands to remove oil and dirt. Choose a clean, dry area away from fans, open windows, and other sources of airborne dust.
Next, clean your phone’s screen using a microfiber cloth.
If your screen has fingerprints or stubborn marks, use a screen cleaning solution or the cleaning wipe recommended by your screen protector manufacturer.
Make sure the display is completely dry before continuing.
Tip: Use a flashlight held at an angle to check for dust or fingerprints. Even a tiny particle can create a noticeable bubble.
Step 2: Identify the Type of Bubble
Before lifting your screen protector, take a closer look at the bubble.
There are three common types:
Air bubbles: These look like clear pockets of air without anything visible in the center. They can often be pushed toward the nearest edge.
Dust bubbles: These usually have a tiny speck or fiber in the center. Pressing them won’t remove the particle, so the protector may need to be lifted carefully.
Moisture bubbles: These may look cloudy or resemble small wet spots. Their appearance depends on the type of protector and the liquid trapped underneath.
Identifying the bubble helps you decide whether to smooth it out, remove dust, or reapply the protector.
Step 3: Carefully Lift the Protector if Dust Is Trapped
If the bubble contains dust, gently lifting the nearest edge may help you remove the particle.
Start at the corner closest to the bubble. If the protector’s instructions allow it, use a clean fingernail or a thin plastic tool to lift the edge slowly.
Avoid lifting the entire protector unless necessary.
Be especially careful with tempered glass. It can crack when bent or lifted unevenly. If the protector is already damaged or refuses to lift safely, replacing it is the better option.
Once you expose the area, avoid touching the adhesive with your fingers.
Step 4: Remove Dust and Smooth Out the Bubbles
If you find a dust particle, use a dust removal sticker to lift it from the exposed screen.
If dust is stuck to the adhesive side of the protector, gently dab it with a fresh dust sticker. A small piece of clean tape may also work if the protector manufacturer permits it.
Do not wipe the adhesive with a cloth. This can leave fibers behind or reduce the adhesive’s ability to stick.
Once the dust is removed, lower the protector back into position.
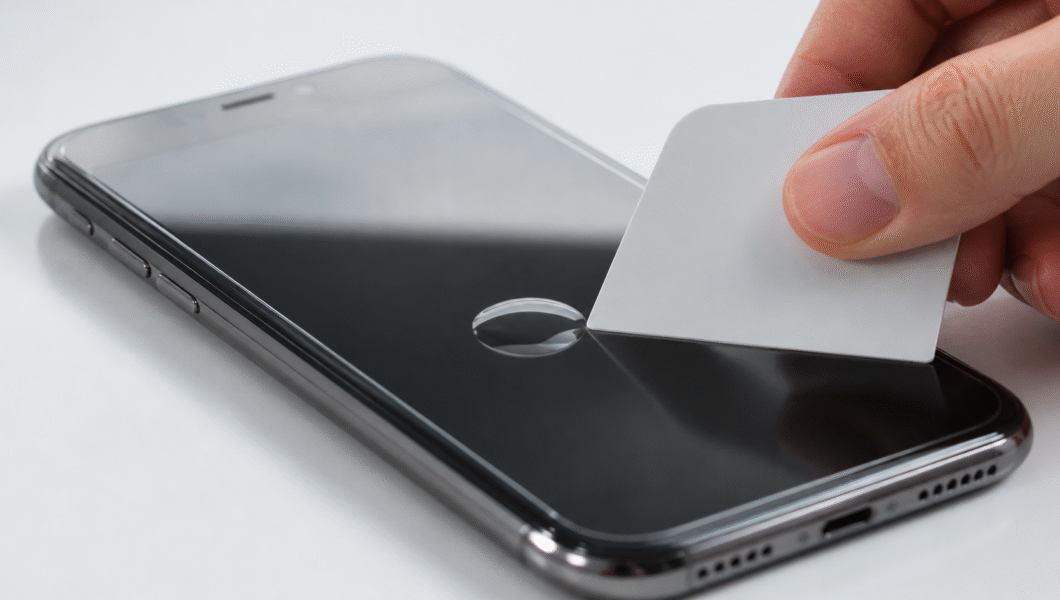
For air bubbles, use a soft plastic card or squeegee wrapped in a microfiber cloth.
Start near the center of the bubble and gently push toward the closest edge. Use light, even pressure.
Avoid pressing too hard, especially on tempered glass.
Important: If the bubble keeps returning, the adhesive may not be bonding properly. Repeatedly lifting and pressing the protector can make the problem worse.
Step 5: Let the Screen Protector Settle
After removing the bubbles, leave your phone on a flat surface for a few hours.
Some tiny air pockets under certain film protectors may disappear as the adhesive settles.
Avoid pressing the protector repeatedly or exposing your phone to excessive heat.
If bubbles remain after the manufacturer-recommended settling period, check whether the protector is compatible with your phone’s display.
Persistent bubbles may indicate dust, damaged adhesive, poor fit, or an incompatible screen protector.
In that case, replacing it may be the easiest solution.
How to Remove Stubborn Screen Protector Bubbles
Some bubbles can be more difficult to remove, especially around the edges or near the camera cutout.
Here’s what you can do.
Bubbles Near the Edges
Edge bubbles may appear when the protector doesn’t fit the screen properly or when the edges aren’t making full contact.
Try gently smoothing the bubble toward the nearest edge using a soft card.
If it returns, check whether the protector is correctly aligned and compatible with your phone.
Some protectors have small gaps around the edges because of their design. These are not always bubbles.
Bubbles Around the Camera or Speaker
These areas can be tricky because the protector has cutouts that interrupt the adhesive surface.
Make sure the protector is aligned correctly with the camera and speaker openings.
If a bubble remains around a cutout, avoid pressing directly against the camera or speaker.
If the protector doesn’t fit properly, replacing it with a compatible model may solve the issue.
Bubbles That Keep Coming Back
If bubbles return after you’ve removed them, the adhesive may be damaged or the protector may not be compatible with your screen.
Check the following:
- Is the screen protector designed for your phone model?
- Is the display clean and dry?
- Is the protector cracked or damaged?
- Are the edges lifting?
- Has the protector been removed and reapplied several times?
If the adhesive has lost its grip, replacing the protector is usually the most reliable solution.
Common Mistakes to Avoid
Removing screen protector bubbles is simple, but a few mistakes can make the problem worse.
Applying Too Much Pressure
Pressing too hard can crack tempered glass or damage the protector’s adhesive.
Use gentle, even pressure instead.
Using a Hair Dryer
Avoid using a hair dryer to remove screen protector bubbles unless the manufacturer specifically recommends it.
Excessive heat can damage your phone or affect the adhesive.
Poking Bubbles with a Pin
Never use a pin or needle to puncture a bubble in tempered glass.
Sharp tools can damage the protector and potentially scratch the display.
Repeatedly Lifting the Protector
Lifting the protector multiple times can weaken the adhesive and introduce more dust.
Try to remove the problem particle in one careful attempt.
Applying the Protector in a Dusty Area
Dust is one of the most common reasons bubbles remain under a screen protector.
Always clean the display and workspace before application.
How to Prevent Bubbles When Applying a Screen Protector
The easiest way to remove bubbles is to prevent them from appearing in the first place.
Follow these tips when applying your next screen protector.
Use an alignment frame.
Many screen protector kits include an alignment frame that helps position the protector correctly.
It reduces the chance of misalignment and makes application easier.
Clean the screen thoroughly.
Remove fingerprints, dust, and debris before applying the protector.
Use the cleaning materials recommended by the manufacturer.
Choose a clean, dry workspace.
Avoid applying the protector near fans, open windows, or dusty surfaces.
A clean environment reduces the risk of dust becoming trapped underneath.
Apply the protector slowly.
Lower the protector gradually, following the manufacturer’s instructions.
This gives air a chance to escape instead of becoming trapped.
Choose a compatible screen protector.
Make sure the protector is designed for your phone’s exact model.
A poor fit can cause edge bubbles and adhesive problems.
When Should You Replace Your Screen Protector?
Sometimes, removing bubbles isn’t enough.
Consider replacing your screen protector if:
- The protector is cracked or damaged.
- The adhesive no longer sticks properly.
- Bubbles keep returning after careful application.
- Dust is permanently trapped underneath.
- The protector doesn’t fit your phone correctly.
- The edges continue to lift.
A new protector is often the better choice when the adhesive has lost its grip.
Frequently Asked Questions
How do I remove bubbles from a screen protector without removing it?
For small air bubbles, use a soft plastic card wrapped in a microfiber cloth. Gently push the bubble toward the nearest edge.
If the bubble contains dust, you may need to lift the protector carefully to remove the particle.
Will bubbles under a screen protector disappear on their own?
Some tiny air bubbles under certain film protectors may disappear as the adhesive settles.
However, bubbles caused by dust, damaged adhesive, or poor fit usually won’t disappear without intervention.
Can I remove bubbles from a tempered glass screen protector?
Yes. Small air bubbles can often be pushed toward the nearest edge using gentle pressure.
If dust is trapped underneath, carefully lifting the protector may help, but tempered glass can crack during removal.
If the protector is damaged or the adhesive has lost its grip, replacing it is usually the safest option.
Why do bubbles keep coming back under my screen protector?
Bubbles may keep returning because of dust, damaged adhesive, poor alignment, or an incompatible screen protector.
Check the protector’s fit and condition. If the adhesive is no longer bonding properly, replace it.
Should I use a hair dryer to remove screen protector bubbles?
It’s best to avoid using a hair dryer unless the screen protector manufacturer specifically recommends it.
Excessive heat can damage your phone or affect the adhesive.
How long should I wait for screen protector bubbles to disappear?
Some tiny air pockets under film protectors may settle within a few hours or days.
The time depends on the protector’s material and adhesive. Follow the manufacturer’s instructions for the best results.
Conclusion
Bubbles under a screen protector can be frustrating, but they’re often easy to fix.
Start by cleaning your screen and identifying the type of bubble. If it’s trapped air, gently push it toward the edge. If dust is causing the problem, carefully remove the particle and reapply the protector.
Finally, let the protector settle without applying unnecessary pressure or heat.
With a clean workspace, careful application, and the right tools, you can reduce bubbles and keep your phone’s display looking clear.
Remember: If the protector is damaged, the adhesive has lost its grip, or bubbles keep returning, replacing it is usually the best solution.