

A duplex receptacle is simply an electrical outlet with two places to plug in, all in one box. Most of the time, these types of outlets are rated for 15 or 20 amps and can be found commonly in homes or offices. Understanding proper wiring helps you protect yourself and improve the quality of your work.
This article shows how to wire a duplex receptacle clipart. Even though all wiring installation should be carried out with care and in line with laws, this guide tells you all you need to know about the process.
What You Will Need
Before you begin wiring a duplex receptacle, ensure you have the following tools and materials:
Materials:
· Duplex receptacle (15A or 20A)
· Electrical box
· 14/2 or 12/2 NM cable, depending on circuit
· Wire nuts
· Electrical tape
· Wall plate
· Grounding screw or clip
Tools:
· Voltage tester or multimeter
· Wire stripper
· Screwdriver (flathead and Phillips)
· Needle-nose pliers
· Utility knife
Important:
You should shut down the power for the circuit before you do any electrical work at the main breaker panel. Test the wires by using a voltage tester so you can be sure no current is there.
If you’re not confident about working with electricity, it’s important to ask a licensed electrician for advice.
Steps to Install a Duplex Receptacle
Disconnect Power and Confirm Flip Switch
· Find the circuit that gives electricity to the outlet in your breaker panel and switch it off.
· To make sure the power is off, use a voltage tester.
Remove the Old Receptacle if You Plan to replace it
· Unscrew the wall plate and outlet from the electrical box.
· Very carefully take out the receptacle and loosen the screws or take the wires out of any push-in connectors.
Identify the wires at the place
Normally, an ordinary outlet box will hold the following items:
· Black (hot) refers to joining the brass screws.
· White (neutral) – connects with the silver screws
· Bare copper or green (ground) – fit it to the green screw or grounding clip
If you notice two different sets of cables, it generally indicates the receptacle is in the middle of the circuit’s path (it gets power from one cable and sends it to another).
Get the wires ready
· Use a wire stripper to remove almost 3/4 inch of insulation from every wire.
· Twist the identical wires together and put a wire nut in place where needed (for example, two black wires).
· Create a loop in the end of each wire using the needle-nose pliers to hook them on to the screws.
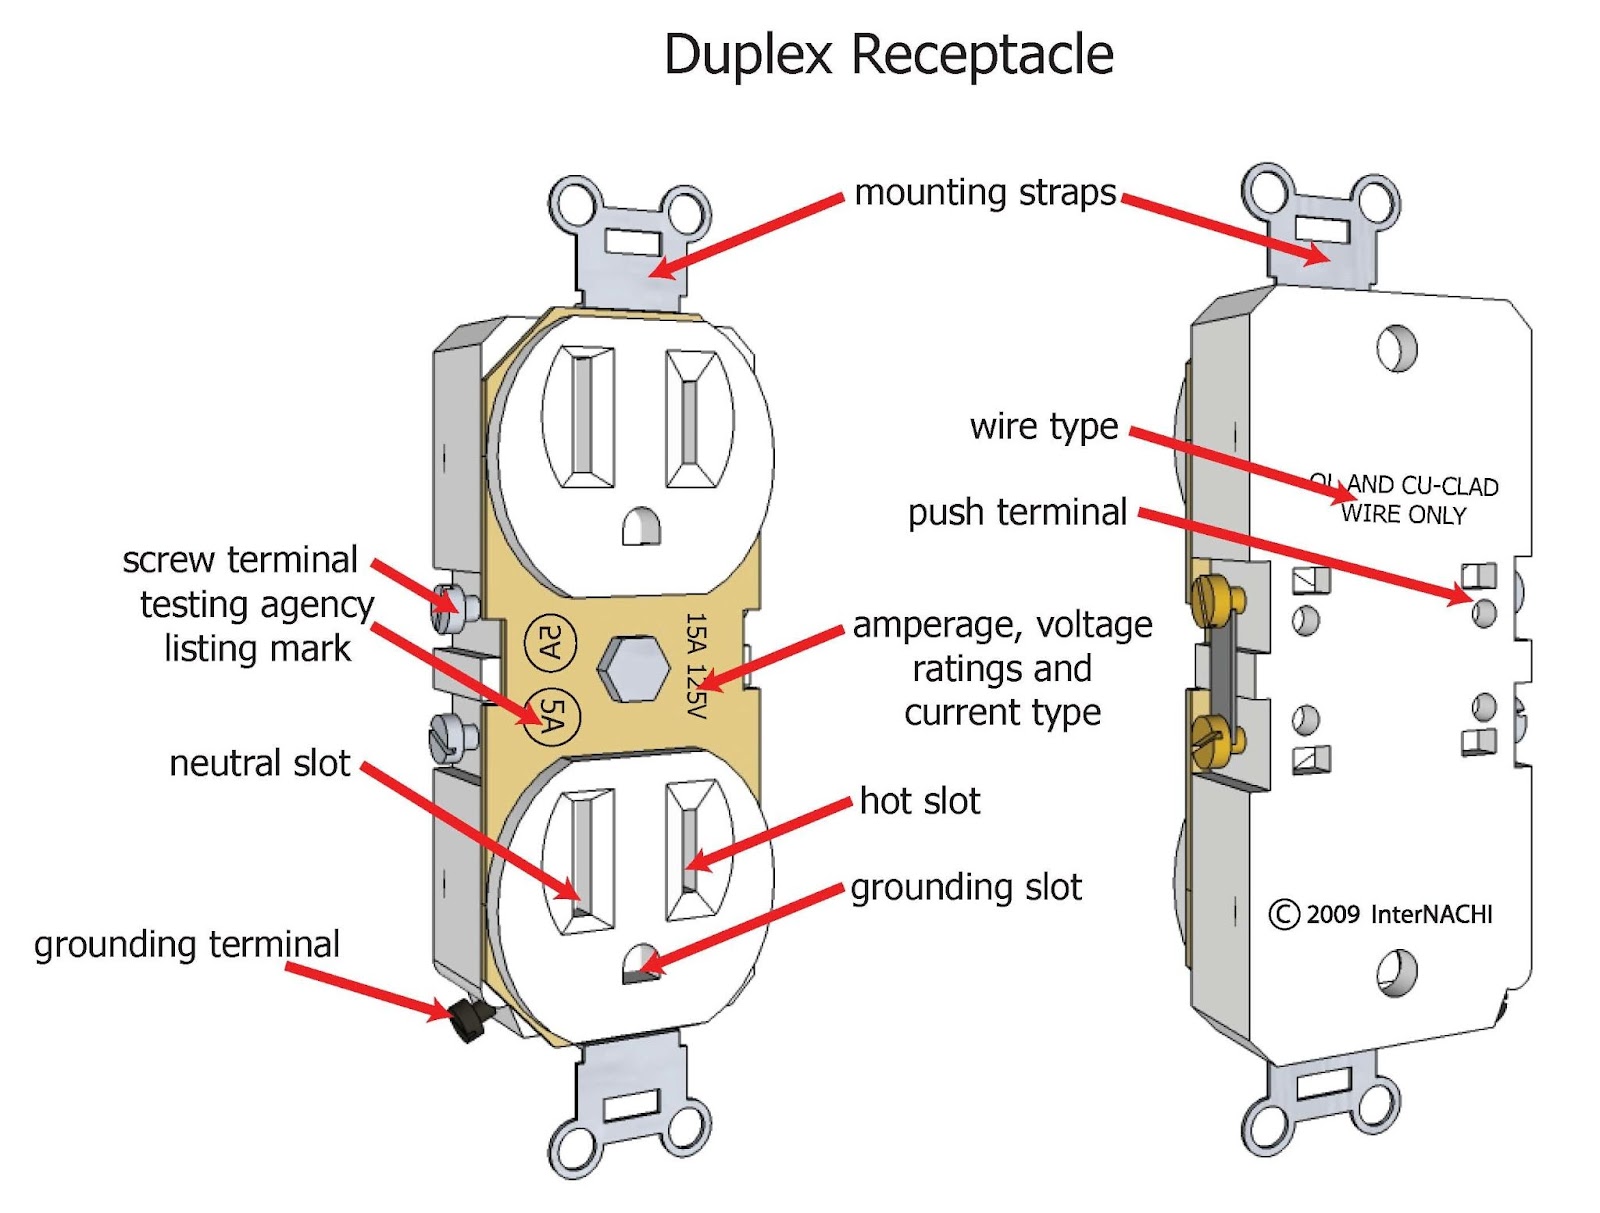
Understand Receptacle Layout
Before wiring, take some time to learn where the terminals are located on the receptacle.
· Black (hot) wires are Brass screws.
· White (neutral) wires are silver screws.
· A green screw is ground.
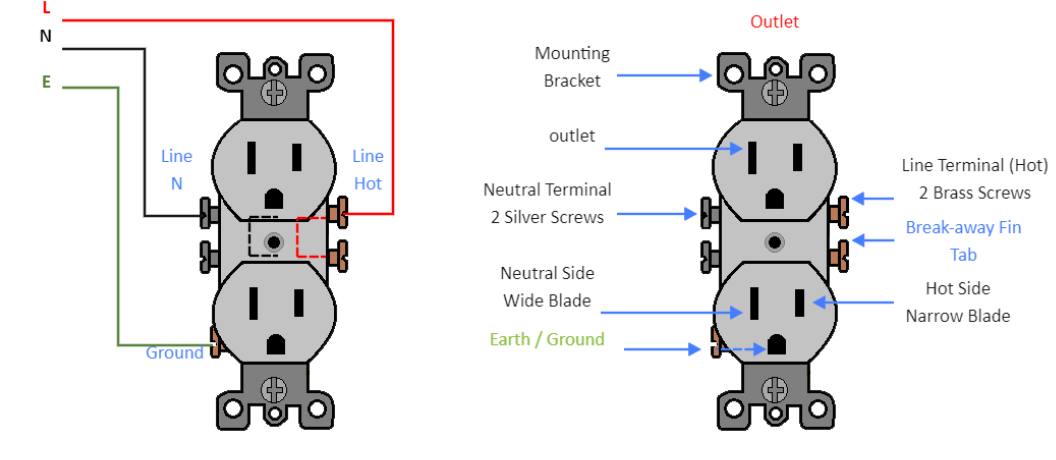
Most of the time, there’s a white removable tab linking the hot and neutral terminals on duplex receptacles. If you’re working on a split receptacle, you should break this tab.
Wire the Ground to the Outlet
· Make a loop from the bare copper ground wire around the green grounding screw.
· Make the screw as tight as you can.
· Should there be a metal electrical box, fasten it with a grounding clip or screw.
Link the Neutral Wire
· Loop the white wire once more on the silver terminal screw that is marked white or neutral.
· Set up the loop clockwise to tighten as you turn the screw.
· Screw the nut tightly.
Link the hot wire to the right connections
· Loop the black wire around the brass terminal screw.
· Loop it clockwise and tighten the nut well.
Put the wires neatly inside the box.
· Fold the wires properly and put them back into the box.
· Secure the outlet to the box by using the supplied screws.
· Place the wall plate where needed.
Turn On the Power and Test
· Head back to the breaker panel and turn on the circuit’s control.
· If you have a plug-in tester, insert it into the outlet. If you don’t have one, insert a lightbulb into the socket.
· Ensure that both receptacles work and are wired correctly.
Best Practices
· Ensure that the type of wire connector (also called a wire nut) matches the gauge of the wire you’re connecting.
· Do not over tight the screws, just try to make a secure connection.
· For safety, choose GFCI outlets for use in areas such as bathrooms, kitchens, garages, or outside your home.
· Give each wire a label when several cables are installed.
· See what is required by local codes and consider getting an inspection if you need to.
Final Words
If you have the proper tools, information, and precautions, wiring a duplex receptacle can be done by yourself. No matter if you are upgrading old outlets or putting up new ones, following a clear order ensures your home is safe and the outlets work correctly. If you’re just starting with electrical wiring, clipart can support your learning and make you more confident.
But, keep in mind if you aren’t sure, call a licensed electrician. Electricity won’t tolerate mistakes, so correct installation is important for both results and safety.
FAQs:
1. What is a duplex receptacle, and where is it commonly used?
A duplex receptacle is a standard wall outlet that gives two plug-in points. It is mostly used in houses and offices to supply electricity for different devices from one source.
2. Do I have to tear off the metal tab on the receptacle?
If you need to use a split receptacle that separates the power to each plug, then you can break it. Otherwise, don’t remove the tab for standard wiring.
3. Is it safe for me to wire a duplex outlet on my own?
Yes—as long as you are careful. You have to turn the breaker off and understand some wiring. But if you are not sure, call an electrician.


No Comments