A ragged leather edge can ruin an otherwise good project. Whether you’re making a wallet, a belt, a watch strap, or a simple keychain, the quality of your cuts shows in the finished piece. Wobbly lines, fuzzy edges, and torn corners make handmade work look rushed.
You don’t need a workshop or expensive machinery to get clean results. With a few basic tools and good technique, you can cut leather by hand at home and get crisp, professional-looking edges. These seven tips cover everything from blade sharpness to final edge finishing.
What You’ll Need Before You Start
Gather your tools first so you aren’t improvising mid-cut:
- A sharp cutting tool (utility knife, round knife, or leather shears)
- A self-healing cutting mat
- A metal ruler or straightedge
- A scratch awl, silver gel pen, or chalk for marking
- Scrap leather for practice
- A sharpening stone and leather strop (or at least a strop with polishing compound)
- Fine sandpaper, an edge beveler, and a burnishing tool for finishing
Tip 1: Start with a Truly Sharp Blade
Nothing affects cut quality more than blade sharpness. A dull blade drags and tears the fibers instead of slicing them, which leaves fuzzy, uneven edges no matter how steady your hand is.
Choosing Your Cutter
- Utility knife: Affordable, easy to find, and great for straight cuts with a ruler. Snap-off or replaceable blades keep things sharp with little effort.
- Round knife: The traditional leatherworker’s tool. Its curved blade handles long straight cuts and smooth curves, but it takes practice.
- Leather shears: Good for thin leather and gentle curves, though they can leave slightly less crisp edges on thick hides.
Signs Your Blade Is Dull
- You have to press hard to get through the leather
- The blade skips or drags
- The edge looks fuzzy or shredded
- You need several passes for a cut that should take one or two
How to Sharpen and Strop at Home
For fixed blades like a round knife, use a sharpening stone (a 1000 grit followed by a 3000 or higher grit works well) to set a keen edge. Then strop the blade on leather loaded with polishing compound, which removes the microscopic burr and leaves a razor-fine edge. Stropping often, even every few cuts, keeps the blade sharp far longer. If you use a snap-off blade, just snap or replace it as soon as it starts to drag.
Tip 2: Use a Self-Healing Cutting Mat
Your cutting surface matters more than most beginners expect. Cutting on a hard surface like glass, tile, or a granite counter dulls your blade almost instantly and can make the knife skid.
A self-healing cutting mat gives slightly under the blade, which protects the edge and gives you cleaner, more controlled cuts. It also protects your table.
Alternatives If You Don’t Have a Mat
- A poly cutting board (the soft plastic kind sold for leatherwork)
- A thick piece of scrap cardboard or a stack of cardstock
- A sheet of thick rubber
Avoid wood for precision cutting, since the grain can pull the blade off line. And never use glass or stone.
Tip 3: Mark Your Cut Lines Clearly
You can’t cut cleanly along a line you can’t see. Take time to mark accurately before the blade touches the leather.
Best Marking Tools
- Scratch awl: Makes a fine, permanent scratch that’s easy to follow and won’t smudge. Best for areas hidden on the finished piece.
- Silver gel pen or leather-safe marker: Shows up well on dark leather.
- Tailor’s chalk or a white pencil: Useful on dark leather and easy to wipe away.
Using Templates and Patterns
For anything you’ll make more than once, cut a template from cardstock, acrylic, or thin plastic. Hold the template firmly and trace around it. Templates keep your pieces consistent and save you from re-measuring every time.
Grain Side vs. Flesh Side
Whenever possible, mark on the flesh (rough) side of the leather. That way any marks stay hidden on the finished piece. If you must mark the grain (smooth) side, use a light touch or a mark you can remove completely.
Tip 4: Use a Metal Ruler or Straightedge
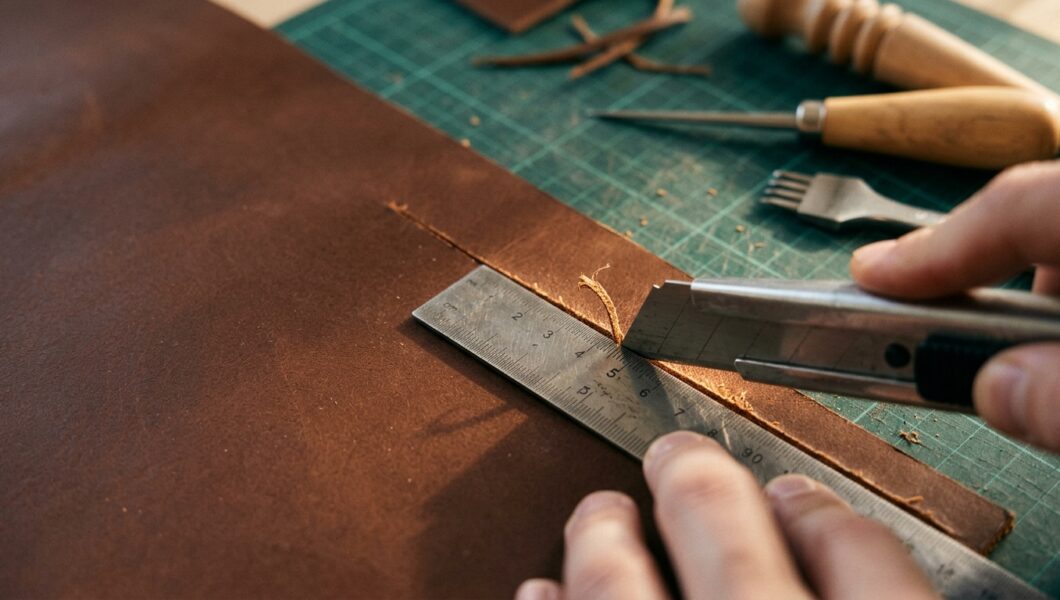
Freehand cuts rarely stay straight, and a plastic ruler can get nicked by your blade, ruining the guide and your line. A steel ruler or metal straightedge gives you a firm guide that the knife can safely run along.
Holding the Straightedge Steady
- Press down firmly with your non-cutting hand, keeping your fingers well back from the blade path
- Choose a ruler with a cork backing, or add a strip of non-slip material, so it doesn’t creep
- Make sure the ruler sits exactly on your marked line, with the blade riding against its edge
If the ruler shifts mid-cut, stop and reset it rather than trying to correct the line.
Tip 5: Cut with Light Passes, Not Force
The biggest mistake beginners make is trying to cut through in one heavy pass. Force makes the blade wander, tears the leather, and increases the risk of injury.
Score First, Then Cut Through
Begin with a light scoring pass to create a guide groove, then follow it with one or more passes that gradually go deeper. The first pass sets the path. The later passes simply follow it, which keeps the line straight and the edge smooth.
Blade Angle and Pressure
- Keep the blade as upright (close to 90 degrees) as you can so the edge stays square
- Use steady, even pressure rather than pushing hard
- Let the sharp blade do the work
Direction of Cut
Draw the blade in one smooth, continuous motion rather than sawing back and forth, which leaves ragged edges. Whichever direction feels most controlled to you, make sure your free hand is never in line with the blade’s path. With a round knife, use a smooth rocking motion, pushing the blade through the leather with the cutting edge rolling forward.
Tip 6: Cut Curves and Corners Properly
Curves and corners are where clean cuts most often fall apart. Slow down and use the right technique.
Using a Round Knife or Shears for Curves
A round knife’s curved edge follows gentle curves naturally. For tighter curves in thinner leather, sharp shears work well. Cut in small, controlled sections rather than trying to complete a long arc in one go.
Clean Inside and Outside Corners
- Outside corners: Cut one side to the corner, then reposition and cut the other side, stopping exactly at the corner point.
- Inside corners: Cut each side up to the corner from opposite directions so the cuts meet cleanly, rather than cutting past the corner and leaving an overcut.
Rotate the Leather, Not Your Wrist
When following a curve, turn the leather as you cut so your hand and blade stay in a comfortable, natural position. Twisting your wrist awkwardly changes the blade angle and makes the cut uneven.
Tip 7: Finish and Clean Up the Edges
Even a good cut can look unfinished until the edges are cleaned up. A little finishing turns a clean cut into a professional one.
Trim Stray Fibers
Use a sharp blade or small scissors to remove any loose fibers along the edge.
Sand and Bevel
Lightly sand the edge with fine-grit sandpaper to smooth any roughness. Then use an edge beveler to round off the sharp corner of the edge. Beveling gives a softer, more finished look and helps the edge resist wear.
Burnish for a Polished Edge
Dampen the edge slightly with water (or use gum tragacanth or a similar edge finish), then rub briskly with a wooden slicker, canvas, or burnishing tool. The friction and heat compress the fibers into a smooth, glossy, sealed edge. For a deeper finish, apply edge paint or wax after burnishing.
Common Mistakes to Avoid
- Using a dull blade. Sharpen or replace it before it starts causing problems.
- Rushing. Slow, deliberate cuts beat fast ones every time.
- Cutting on the wrong surface. Hard surfaces dull blades and cause slips.
- Cutting through thick leather in one pass. Make several lighter passes instead.
- Skipping the practice run. Test your technique on scrap before cutting your good leather.
Safety Tips
Leather knives are extremely sharp, so treat them with respect:
- Keep your fingers clear of the blade’s path at all times
- Make sure the leather and your straightedge are firmly secured before cutting
- Cut away from your body or in a direction where a slip won’t reach you
- Retract or cover blades when you’re not using them
- Work in good lighting and never when you’re tired or distracted
Conclusion
Clean leather edges come down to a handful of habits: a sharp blade, the right surface, accurate marking, a solid straightedge, patient light passes, careful curves, and thoughtful finishing. None of these require expensive equipment, just attention and practice.
Before you cut into your best hide, practice on scrap pieces to get a feel for the pressure, angle, and rhythm. Once the technique becomes second nature, you’ll find your projects look noticeably sharper and more professional.
FAQ
What is the best knife for cutting leather by hand?
For beginners, a utility knife with a sharp, replaceable blade is the easiest and most affordable choice. As you advance, a round knife offers more control for long cuts and curves.
Can you cut leather with scissors?
Yes, but only sharp, sturdy shears, and generally on thinner leather. Regular household scissors can chew the edges and struggle with thick hides.
How do you stop leather edges from fraying or looking rough?
Start with a sharp blade for a clean cut, then sand, bevel, and burnish the edges. Burnishing compresses the fibers and seals the edge so it looks smooth and polished.