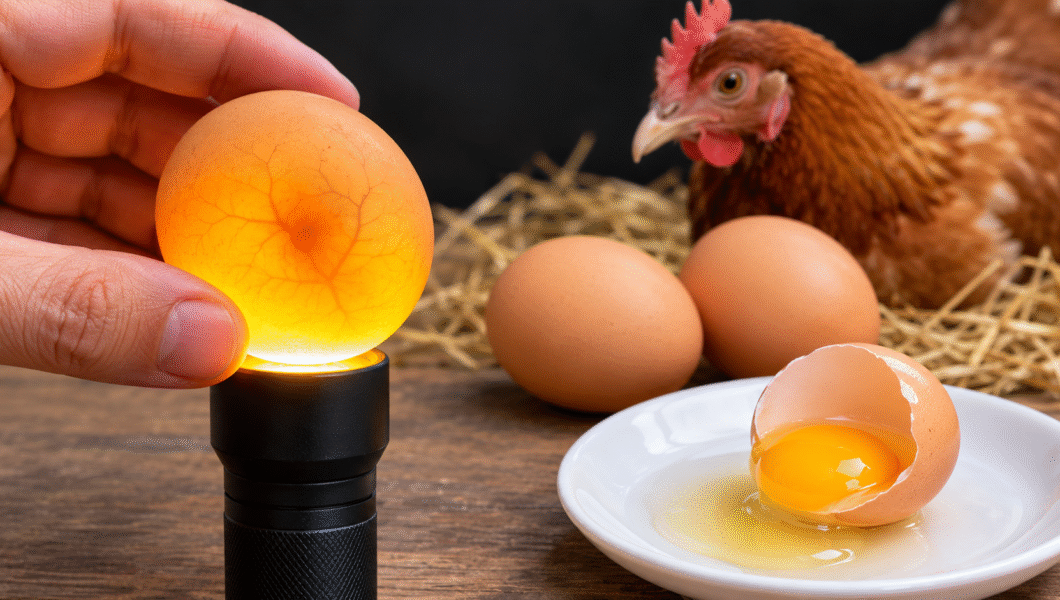
If you keep backyard chickens, you may wonder whether the eggs your hens lay are fertilized and could develop into chicks. Having a rooster in your flock makes fertilization possible, but it does not mean every egg will be fertile.
Fortunately, you can check an egg using a simple technique called candling. You can also examine the yolk of an egg that you do not intend to hatch.
In this guide, you’ll learn how to tell if an egg is fertilized, what to look for during candling, how long development takes, and how to identify eggs that have stopped developing. We’ll also cover egg handling, incubation tips, and common mistakes to avoid.
Whether you’re raising backyard chickens or preparing your first batch of hatching eggs, these practical steps will help you make more informed decisions.
How Do Eggs Become Fertilized?
A hen can lay eggs with or without a rooster. However, an egg can only be fertilized if sperm from a rooster reaches the hen’s egg cell before the egg’s protective layers and shell are formed.
During this process, the male and female reproductive cells combine. The fertilized cell begins dividing and develops into a structure called the blastoderm, which is visible as a small whitish area on the yolk.
Here are a few important things to understand:
- A hen does not need a rooster to produce eggs.
- Eggs from hens that have never mated with a rooster are unfertilized.
- A rooster’s presence makes fertilization possible, but does not guarantee that every egg is fertile.
- Hens can store sperm after mating, allowing them to produce fertilized eggs for a period afterward.
- Fertilization does not automatically mean an egg will develop into a healthy chick.
Do Fertilized Eggs Always Develop Into Chicks?
No. A fertilized egg needs suitable incubation conditions to develop.
For chicken eggs, standard incubation in a forced-air incubator generally requires:
- Temperature: Around 99.5°F (37.5°C).
- Incubation period: Approximately 21 days.
- Proper humidity: Maintained according to the incubator’s instructions and the stage of incubation.
- Regular turning: During most of the incubation period.
- Stable conditions: Avoiding unnecessary temperature and humidity changes.
A fertilized egg that is not incubated under suitable conditions will not normally develop into a chick.
Freshly collected eggs kept cool for ordinary household use do not continue normal embryo development.
Understanding the Different Parts of an Egg
Before checking an egg, it helps to understand its basic structure. These parts also make it easier to recognize normal features during candling.
1. Shell
The hard outer covering protects the contents of the egg. It also contains tiny pores that allow gases to pass through.
2. Egg white (albumen)
The clear liquid surrounding the yolk provides water and protein to support development.
3. Yolk
The yellow center contains nutrients that provide energy for a developing embryo.
4. Germinal disc
This small structure appears on the surface of the yolk. In an unfertilized egg, it is called a blastodisc. After fertilization and early cell division, it develops into a blastoderm.
5. Air cell
The air pocket is located at the wider end of the egg. It gradually becomes larger during incubation as moisture leaves the egg.
6. Chalazae
These twisted white strands help hold the yolk in position. They are normal parts of an egg and do not indicate fertilization.
What Do You Need to Check Whether an Egg Is Fertilized?
You do not need expensive equipment to perform a basic egg check.
For candling, gather the following items:
- A bright LED egg candler or flashlight.
- A dark room or a place with very little light.
- A pencil for marking eggs.
- A notebook or simple record sheet.
- A clean surface for handling eggs.
- An incubator or broody hen if you plan to hatch chicks.
If you want to examine an egg that will not be used for hatching, you can also use a clean plate.
Important: Never crack open an egg that you want to hatch. Once opened, it cannot develop into a chick.
How to Tell If an Egg Is Fertilized Using Candling
<underline>Candling is one of the most useful methods for checking developing chicken eggs.</underline>
It involves shining a bright light through the shell in a dark room. The light makes internal structures visible, helping you identify blood vessels, embryo development, and possible problems.
Here is how to do it.
Step 1: Confirm That a Rooster Has Been Around
Start by checking whether your hens have had access to a rooster.
If your hens have never mated with a rooster, their eggs will be unfertilized.
However, the presence of a rooster does not guarantee that every egg is fertilized. The most reliable confirmation comes from examining the egg itself.
Step 2: Wait Until the Right Time
Do not expect to see a developing chick immediately after an egg is laid.
During the first few days of incubation, the embryo is extremely small. Its structures may be difficult to identify.
For a more reliable first check, wait until approximately day 7 of incubation.
Some development may become visible around days 4 or 5, but waiting longer makes the results easier to interpret.
Step 3: Prepare Your Candling Equipment
Choose a bright LED candler or flashlight.
A purpose-made egg candler is usually easier to use because it directs light toward the egg.
Make sure the equipment does not produce excessive heat. A hot light source can affect the egg.
Step 4: Darken the Room
Turn off the lights or move to a dark area.
This makes it easier to see the internal structures through the shell.
White and light-colored eggs are generally easier to candle. Brown and darker eggs may require a stronger light.
Step 5: Position the Egg Against the Light
Hold the egg gently with its wider end facing the light source.
The wider end contains the air cell.
Move the egg slightly to examine its contents, but avoid shaking or rotating it roughly.
Step 6: Look for Blood Vessels and an Embryo
A developing egg usually shows several recognizable signs:
- Fine red blood vessels spreading outward.
- A small dark area representing the developing embryo.
- A network of veins resembling a spider.
- Increasing darkness as the embryo grows.
These signs indicate that development is taking place.
Step 7: Identify a Clear Egg
An egg that appears mostly clear, with no visible blood vessels or developing structures, may be infertile.
However, it could also have experienced very early embryonic death.
If the result is uncertain, check again after a short interval rather than making a decision based on one early examination.
Step 8: Check Again and Record Your Findings
Keep a simple record of your observations.
Write down the date you started incubation and the results of each candling session.
This helps you compare development and identify eggs that have stopped progressing.
What Does a Fertilized Egg Look Like at Different Stages?
The appearance of a chicken egg changes throughout the 21-day incubation period.
Here is a practical development timeline.
Day 1 to 3: Early Development
The embryo is extremely small.
Most beginners will find it difficult to identify clear signs of development during this stage.
Avoid unnecessary handling and give the egg time to develop.
Day 4 to 6: Early Blood Vessels
Some developing eggs may begin showing small blood vessels.
However, these structures can be difficult to see, particularly in brown eggs.
If you are unsure, wait until around day 7.
Day 7: First Reliable Candling Check
<underline>This is one of the best times for a beginner’s first candling examination.</underline>
A developing egg should generally show:
- Visible red blood vessels.
- A darker central area.
- A spider-like pattern of veins.
- Sometimes slight embryo movement.
An egg that remains completely clear should be checked carefully before being classified as infertile.
Day 10: More Visible Development
By day 10, the embryo has grown considerably.
The darker area becomes larger, and the blood vessels are generally easier to identify.
Some movement may also be visible.
If an egg showed development earlier but now has a blood ring or no signs of continued growth, it may have stopped developing.
Day 14: The Embryo Becomes Larger
The developing chick occupies more space inside the egg.
The egg appears darker during candling, although some blood vessels may still be visible.
The air cell at the wider end should also be larger than it was during the earlier stages.
Day 18: Final Candling Check
By day 18, most of the egg will appear dark because the chick has grown significantly.
You may notice:
- A large dark area.
- A clearly visible air cell.
- Limited light passing through the shell.
- Occasional movement.
At this stage, prepare for the final days of incubation.
Stop turning the eggs around day 18 and follow your incubator’s hatching instructions. This final period is commonly called lockdown.
How to Tell If an Egg Is Fertilized by Cracking It Open
If you are checking an egg that you do not intend to hatch, you can examine its yolk.
This method looks for the appearance of the germinal disc.
Signs of an Unfertilized Egg
An unfertilized egg generally has a small, compact white spot on the yolk.
This structure is called a blastodisc.
It may look like a tiny white dot with slightly irregular edges.
Signs of a Fertilized Egg
A fertilized egg generally has a larger, more clearly defined whitish ring on the yolk.
This structure is called a blastoderm.
It may resemble a small white bullseye.
The difference can be subtle, especially if you have never examined eggs this way before.
For a beginner, candling an incubated egg is usually a more practical way to observe whether an embryo is developing.
Remember: Cracking an egg destroys its ability to hatch, so only use this method on eggs you have decided not to incubate.
Fertilized vs. Unfertilized Eggs: Key Differences
Here is a quick comparison of the main signs.
| Check | Fertilized egg | Unfertilized egg |
|---|---|---|
| Before incubation | Usually shows a whitish ring on the yolk | Usually shows a small white spot |
| Candling around day 7 | Blood vessels and dark embryo | Usually appears clear |
| Candling around day 10 | Larger embryo and visible veins | No developing embryo |
| Later incubation | Increasingly dark appearance | Remains clear |
| Can develop into a chick? | Yes, under suitable conditions | No |
| Taste and nutrition | Essentially the same | Essentially the same |
A blood ring is a different finding. It suggests that an embryo started developing but died early.
Can You Tell If an Egg Is Fertilized Without Candling?
No reliable external method can confirm fertilization.
A fertilized egg looks almost identical to an unfertilized egg from the outside.
The following characteristics do not reliably indicate whether an egg is fertilized:
- Shell color.
- Egg size.
- Egg shape.
- Shell markings.
- Yolk color.
- Whether the egg floats or sinks in water.
These characteristics may tell you something about the egg’s quality or freshness, but they cannot confirm fertilization.
For reliable results, use candling during incubation or examine the germinal disc of an egg that will not be hatched.
Common Problems You May Notice During Candling
Not every incubated egg develops successfully.
Understanding the signs of problems can help you avoid keeping unsuitable eggs in the incubator.
1. Blood Ring
A blood ring appears as a reddish circular line inside the egg.
It usually indicates that an embryo began developing but died during the early stages.
2. Completely Clear Egg
A clear egg has no visible blood vessels or developing embryo.
It may be infertile or may have stopped developing before recognizable blood vessels formed.
3. No Growth Between Checks
If an embryo does not appear to grow between candling sessions, development may have stopped.
Compare your observations rather than relying on a single examination.
4. Unusual Gas Bubbles
Unexpected bubbles or abnormal internal changes may indicate a problem.
Do not open or shake a questionable egg. Remove eggs showing convincing signs of failure according to appropriate incubation guidance.
5. Unpleasant Smell or Leakage
A leaking egg or one with a foul smell may be spoiled.
Remove it carefully, avoid contaminating other eggs, and clean the affected area according to your incubator’s instructions.
Tips for More Accurate Egg Checking
Good egg handling improves the chances of successful incubation.
Follow these practical recommendations.
Use suitable hatching eggs
Choose eggs that are clean, intact, and reasonably uniform in size. Avoid cracked, heavily soiled, or unusually shaped eggs.
Choose fresh eggs
For better hatchability, aim to incubate eggs within 7 to 10 days of collection. Hatchability generally declines as storage time increases.
Do not wash hatching eggs
The eggshell has a natural protective coating called the bloom or cuticle.
Washing can damage this protective layer and increase the risk of bacterial contamination.
Use a suitable LED candler
A bright, cool LED light is generally a good option. Darker shells may require a more powerful candler.
Handle eggs gently
Avoid shaking, dropping, or roughly rotating eggs.
Keep incubation records
Record the collection date, incubation start date, and candling results.
Follow your incubator’s instructions
Temperature, humidity, ventilation, and turning requirements all influence successful hatching.
Avoid unnecessary checks
Candling does not need to become a daily activity. Checking at suitable intervals gives you useful information without unnecessary handling.
Common Mistakes to Avoid
Even experienced backyard poultry keepers can make mistakes when checking eggs.
Here are some problems worth avoiding.
Assuming every egg from a farm is fertilized
Farm eggs are not automatically fertile. Fertilization requires successful mating with a rooster.
Candling too early
Very early candling can make a developing egg appear clear. Wait until around day 7 for a more dependable first check.
Confusing a blood spot with fertilization
A small blood spot in an ordinary egg is not proof of fertilization. Blood spots can result from a small blood vessel breaking during egg formation.
Using a hot light source
Excessive heat can damage an embryo. Use a cool LED candler whenever possible.
Washing hatching eggs
Removing the natural protective coating can increase contamination risks.
Opening eggs intended for hatching
Once cracked, an egg cannot continue normal incubation.
Ignoring failed eggs
Eggs that have died or spoiled should not remain in the incubator. They can leak, contaminate equipment, and create problems for other eggs.
Safety and Hygiene When Handling Eggs
Eggs can carry bacteria, including Salmonella, even when their shells look clean.
Follow basic hygiene practices when handling both ordinary eggs and hatching eggs.
- Wash your hands before and after handling eggs.
- Clean equipment and work surfaces regularly.
- Avoid using cracked or leaking eggs for food.
- Do not eat eggs that have been incubated.
- Discard eggs with foul odors or unusual signs of spoilage.
- Keep the incubator clean and follow the manufacturer’s cleaning instructions.
- Keep electrical equipment away from water.
For ordinary table eggs, follow local food-safety guidance and refrigerate them appropriately.
If an egg has been incubated, do not treat it as an ordinary fresh egg for cooking.
Frequently Asked Questions
1. How can I tell if an egg is fertilized at home?
The easiest method is candling. Place a bright LED light against the wider end of an incubated egg in a dark room. Around day 7, a developing egg should show visible blood vessels and a darker embryo.
2. How many days does it take to see a fertilized egg developing?
Some early signs may appear around days 4 to 6, but day 7 is generally a better time for the first reliable candling check.
3. Can a fertilized egg be eaten?
A freshly collected, properly stored fertilized egg is generally safe to eat when handled and thoroughly cooked like any other egg. Fertilization does not significantly change its nutritional value.
However, do not eat eggs that have been incubated.
4. Can grocery store eggs hatch?
Most ordinary grocery-store eggs are produced by hens kept without roosters, so they are unfertilized. Commercial refrigeration and handling also make ordinary table eggs unsuitable for normal hatching.
5. Does a blood spot mean an egg is fertilized?
No. A blood spot is usually caused by a small blood vessel breaking during egg formation. It is not proof of fertilization.
6. What does a fertilized egg look like before incubation?
When cracked open, a fertilized egg generally has a larger, ring-shaped whitish germinal disc called a blastoderm. An unfertilized egg usually has a smaller, compact white spot called a blastodisc.
7. How long does it take for a chicken egg to hatch?
A chicken egg normally takes approximately 21 days to hatch under suitable incubation conditions. Temperature, humidity, and proper handling all influence successful development.
8. Can a hen lay fertilized eggs without a rooster?
No. A rooster is required for natural fertilization. However, a hen can continue laying eggs without one.
9. What does a blood ring mean during candling?
A blood ring usually indicates that an embryo started developing but died during the early stages of incubation. It is different from a small blood spot found in an ordinary table egg.
10. How often should I candle chicken eggs?
For a basic home incubation routine, useful checks are around days 7, 10, and 18. Avoid unnecessary handling, especially during the final days before hatching.
The Bottom Line
Knowing how to tell if an egg is fertilized can make backyard chicken keeping much easier.
The most practical method is candling. Around day 7 of incubation, developing eggs should show a network of blood vessels and a darker embryo. By day 10, development becomes more noticeable, while by day 18, the growing chick fills much of the egg.
If you are checking an egg that will not be hatched, examining the yolk for a blastoderm can also help identify fertilization.
Remember that a rooster must mate with the hen for natural fertilization to occur. A fertilized egg also needs suitable incubation conditions to develop successfully.
Handle eggs carefully, maintain good hygiene, and keep accurate incubation records. These simple habits can help you identify developing eggs and improve your understanding of the chicken hatching process.